I do my best to participate in the challenges or games associated with the Facebook Group Endrucks 1920 Project each month. Doing so makes me more aware of tatting fundamentals and helps stretch my tatting skills. For December, the challenge was to add beading to one of the motifs that Elonore Endrucks-Leichtenstern published in 1920. For more information about this group, visit
https://www.facebook.com/groups/1235560633606162
The pattern #32 was re-written by Carin Jansen with notations updated to more modern standards. Frau Endrucks published her work using written instructions in German and in a font that is hard to read by today's standards. She used her own style of notations making following her instructions challenging. Photos of each piece are present throughout the publication, but sometimes the photographer placed the tatting upside down or backwards before capturing the image for print. This adds a layer of complexity to the work as a whole. Consequently, it was Carin's interpretation that was the one I followed for this creation. Carin's pattern is creative enough to offer up 2 ways of carrying out the motif: one that creates a continuoum along one side of the motif at the end of which the tatter can round the end and return to the starting point along the other side;
and the second method creates a motif of blocks that can be joined together to form a length of lace or can be fashioned into a larger square, rectangle or shape such as a cross for a bookmark, according to the wishes of the individual following the pattern.
My goal was to complete this pattern in such a way that it would encircle a satin-wrapped styrofoam tree ornament with a circumference of approximately 8" (20.32 cm). Beads would be added to the tatting thread when the shuttles were wound so they could be added to the outer chain as well as to certain free picots of rings along the way. The pattern as Carin prepared it using the first method did allow for that sort of configuration.
December
#BeadMeEndrucks Christmas Ornament Cap
© 2025 Sally M. Biggers
Abbreviations / Notations:
R = ring p = picot Ch = chain
lbp = long bead
picot prev = previous dnrw = do
not reverse work
lj = lock join vsp = very small picot SCMR = self-closing mock-ring
Links to tutorials:
https://tipsaroundthehome.blogspot.com/p/tatting-resources.html
Basic Tatting Terms English-Italian https://drive.google.com/file/d/1_7DetVeL2rW7Y3GYkyjRdw7S6k8ZcWbh/view
Long Bead Picot technique by Jane Eborall http://www.janeeborall.freeservers.com/AddBeadsNew.pdf
Materials:
Crochet hook 20 15/0 seed beads 10
6/0 seed beads
4 - 6
yards/meters Lizbeth thread size 40 or Olympus Lamé Metallic or similar thread
coiless
safety pins
This pattern can be created with
needle or shuttle
Instructions:
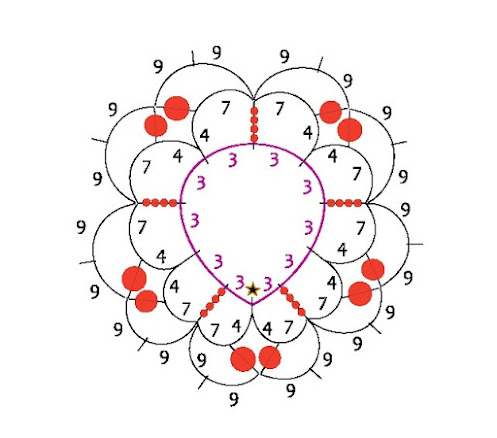
This small
motif is made up of first a central beaded SCMR that alternates 5 long picots
and 5 joining picots. Over each of the
long picots 4 15/0 seed beads are placed (lbp – 4 beads) and held temporarily
by a coiless safety pin until it can be removed at the time they are lock
joined by the chain in Round 1. A 6/0
seed bead is slipped over each picot (lbp – 1 bead) in this round and likewise
held in place by a coiless safety pin until the Round 2 chain connects these
together.
Central Ring:
SCMR: *3 ds, long lpb (4 beads), 3 ds, p *. Repeat from * to * four times leaving off the final p. Close SCMR. DNRW.
Round 1:
Begin Ch with a vsp, * Ch 4 ds, lbp (1 bead), Ch 7 ds, lj to lbp of prev R leaving a small space, 7 ds, lbp (1 bead), 4 ds, lj to next p of prev R *. Repeat from * to * 4 times leaving off the last p and lj to vsp that began the round. Cut, tie and hide ends.
Round 2:
Re-wind shuttle with about 12 in / 30 cms of thread and do not cut from ball. Join to any vsp at the join of the lbp (4 beads) of the previous Round and begin chain. *Ch 9 ds, p, 9 ds, lj simultaneously to both lbp’s of the previous Round, Ch 9 ds, p, 9 ds. Lj at top of lbp (4 beads) of previous round *. Repeat from * to * 4 times, and lj the base of the first chain. Cut, tie and hide threads.
Finish:
Cut a length of thread measuring approximately 45 to 50 cms / 18 to 20 in. Using a tapestry needle, thread one end of the length of thread and begin weaving it through the free picots alternating between the cap created by the above pattern and spaces between the chains on one of the sides of the Endrucks #32 motif around the widest portion of the ornament. When all the spaces and picots have been threaded, adjust the tension between them to be neat and equal, then cut, tie and hide thread ends.
E32’s reworked pattern’s pdf is part of the Endrucks 1920 Project, please for any detail refer to the main Endrucks 1920 Project document: https://docs.google.com/document/d/17LEVftXweztBIOWh4sL4BB7bX65ssoOsOn4oXIgCepY/view )
The pattern may be reproduced for personal use and tatted freely.


No comments:
Post a Comment