January 18, 2025

Craft and Art


 During the past 6 or 7 months, we have been waiting for our new home to be ready for us to move into, there has been some time for reflection about some of the artistic pursuits I enjoy.  These include knitting, crochet, tatting, sewing, papercrafting, rosemalling (traditional Norwegian painting) and watercolor.  With such an extensive list, it's fair to state that I am not necessarily a master of any of these, although I have been active in many of these since childhood.  

As a tatter, I applied to a local Fine Arts League to enter one of their juried shows while also entering the local area fair's heritage techniques competition.  Twice I was awarded a red ribbon for my entry at the Mountain State Fair, but the Fine Arts League refused to allow my entry to their competition.  Upon asking for an expanation of the rational for declining my entry to such an organization, I was told that quilting is an art form, but tatting is not.  This seemed odd to me so an investigation of Art compared to Craft seemed appropriate.   

Not the highest level of researcher, I turned to the internet and found 2 sources that were intriguing:

https://artincontext.org/difference-between-art-and-craft/

and a video entitled  "How Folk Art Shaped the World We Know Today"  

What I am going to share comes from these sources and others as well.  Art historians H. W. Janson and A. F. Janson open their 1000 page "History of Art" by asking "What makes this Art?"  And this is indeed the quintessential question.  Mankind has been expressing himself by way of a variety of vehicles that are lumped together as "Art." From painting, to sculpture, to carving objects out of wood,  stone and bone, forming vessels from clay and turning animal hair (or human hair for that matter) into wearable clothing of unique style.  There is also photography, choreography, drama, music, creative uses of paper (oragami, for example) or even the making of paper itself; the list seems endless.  And still the question remains: "What makes any given endeavor Art?"  And what keeps tatting from being Art?

In the article "Difference Between Art and Craft - A Look at Art Versus Craft," Isabella Meyer wrote that the division between crafts and arts began during the Renaissance Period.  Beginning at the end of  Medieval Times, the Renaissance in Europe was a time of incredible and rapid growth of social, intellectual, economic and cultural growth that involved more secular individuals rather than the scholar-clerics of the previous age.  The great thinkers of the Renaissance were men and women of many talents who introduced new ways of thinking to their various homelands and pursuits.  During the Medieval times and earlier, the term "artist" didn't really exist.  People who were interested in or possessed an afinity to a particular endeavor would study as pupils or apprentices to a master of the skill.  All of them functioned at the behest of the client and generally speaking it was the patron who received the praise for the finished product.  The Renaissance changed that.

During this time there was an increase in modification to the way things were both considered and carried out.  It was the innovations that led to recognition of increasing numbers of outstanding individuals in given fields.  This meant that the artist became separated from the artisan and was subsequently held in higheer esteem.  Neither made their own tools or even materials, however the artists appear to have moved away from group practice such as had existed in the schools and guilds and into the realm of the solitary practitioner.

Additionally, Meyer, writing for the "Art in Context" organization's website, notes that what is seen as artistic has changed over time.  What is seen as Craft has structure and takes a long time to master.  The same can be said for Art and in many cultures, the distinction between them is blurred.  An object created may be very functional, but the design upon the finished product may be contemplated by the owner / observer and be the source of emotions brought up by gazing upon it.

Everyday objects that were functional for the common people were adorned with markings, or symbols of cultural or personal meaning.  Sometimes these were connected to stories that conveyed meanings to the observer.  Techniques that were associated with either the creation of the object itself or the images which adorned it were often passed down from one generation to the next   The Rennaisance did not affect this as a whole but the industrial revolution did.  Everyday objects were no longer created by the user or someone in their village or clan. Instead these were mass produced by machinery.  Sometimes there were crafters marks that were part of the object, but many times there was not.  It was during this phase that people began adding their own ornamentation to machine-made objects.

The Arts and Crafts Movement began in England in the last half of the 19th century.  It was led by people like William Morris and was an international trend in decorative and fine arts concepts that sought a revival of historic craftsmanship that eventually became the movement we now know as Art Nouveau.

One area this trend has specifically left off is that of fiber arts.  This time-consuming and labor intensive art form is one that has been carried out primarily (although not exclusively) by women.  The products that are created are often from natural elements and subject to breakdown and detioration over time by the forces of nature.   Yet the craftsmanship of preparing the fibers, spinning them into thread or yarn then weaving or knotting them together is more than 20,000 years old.  Fabric historians point to ways of creating cloth that have been lost to usbut may still be found in fabric museums around Europe.  This has come about in part because of the industrialization of weaving, knitting, crochet and lace-making  When an artisan puts himself or herself into one of these endeavors, each part of the process tells a story or has significance to both the person who created it and to the one who uses it.

Much artistic endeavors have endurance on its side: native artwork on the surface of clay vessels, the frescos of Italian churches, the plays of Euripides, the poetry of Homer, Dante and Chaucer, the Scandinavian designs on furniture and so many more.  Meyer and others point to function verses emotion as being the dividing line between Art and Craft.  But there is so much more, because what ever is created has a process that arises from desire and can connect the viewer to that desire, whatever the art form.    

Tatting seems to fall into the arena of Folk Art because of its  Living Tradition essence.  It is a practical skill yes, but one that over time has morphed in the hands of cultures around the world and has become a true artform reflecting the life and personal artestry that is unique to the creator.  Folk Art reminds us that "Art" is not confined to museums or galleries.  Art belongs in our homes and in our everyday lives.  It connects us to ourselves and to where we have come from.

Yes, there is Folk Art and there is Fine Art.  And they both have a place.

January 07, 2025

#Bead Me Endrucks December Game

I do my best to participate in the challenges or games associated with the Facebook Group Endrucks 1920 Project each month.  Doing so makes me more aware of tatting fundamentals and helps stretch my tatting skills.  For December, the challenge was to add beading to one of the motifs that Elonore Endrucks-Leichtenstern published in 1920.  For more information about this group, visit 

https://www.facebook.com/groups/1235560633606162

The pattern #32 was re-written by Carin Jansen with notations updated to more modern standards.  Frau Endrucks published her work using written instructions in German and in a font that is hard to read by today's standards.  She used her own style of notations making following her instructions challenging.  Photos of each piece are present throughout the publication, but sometimes the photographer placed the tatting upside down or backwards before capturing the image for print.  This adds a layer of complexity to the work as a whole.  Consequently, it was Carin's interpretation that was the one I followed for this creation.  Carin's pattern is creative enough to offer up 2 ways of carrying out the motif: one that creates a continuoum along one side of the motif at the end of which the tatter can round the end and return to the starting point along the other side; 


and the second method creates a motif of blocks that can be joined together to form a length of lace or can be fashioned into a larger square, rectangle or shape such as a cross for a bookmark, according to the wishes of the individual following the pattern. 


My goal was to complete this pattern in such a way that it would encircle a satin-wrapped styrofoam tree ornament with a circumference of approximately 8" (20.32 cm).  Beads would be added to the tatting thread when the shuttles were wound so they could be added to the outer chain as well as to certain free picots of rings along the way.  The pattern as Carin prepared it using the first method did allow for that sort of configuration.


The motif at the top was not in any way from the Endrucks 1920 Project.  The design was fairly simple and tied the central section to the entire piece.  The pattern follows below and may also be found here:

December #BeadMeEndrucks Christmas Ornament Cap

 © 2025 Sally M. Biggers

Abbreviations / Notations: 

R = ring                                          p = picot                                Ch = chain                             

lbp = long bead picot                    prev = previous                     dnrw = do not reverse work

lj = lock join                                   vsp = very small picot          SCMR = self-closing mock-ring                                                        

Links to tutorials:

https://tipsaroundthehome.blogspot.com/p/tatting-resources.html

Basic Tatting Terms English-Italian https://drive.google.com/file/d/1_7DetVeL2rW7Y3GYkyjRdw7S6k8ZcWbh/view

Long Bead Picot technique by Jane Eborall   http://www.janeeborall.freeservers.com/AddBeadsNew.pdf


Materials:

Crochet hook                        20 15/0 seed beads                         10 6/0 seed beads

4 - 6 yards/meters Lizbeth thread size 40 or Olympus Lamé Metallic or similar thread

coiless safety pins

This pattern can be created with needle or shuttle

Instructions:

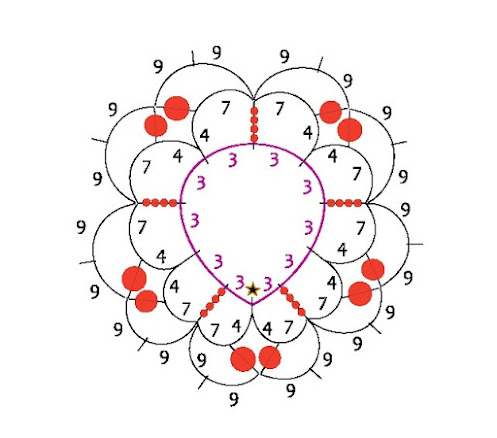
This small motif is made up of first a central beaded SCMR that alternates 5 long picots and 5 joining picots.  Over each of the long picots 4 15/0 seed beads are placed (lbp – 4 beads) and held temporarily by a coiless safety pin until it can be removed at the time they are lock joined by the chain in Round 1.  A 6/0 seed bead is slipped over each picot (lbp – 1 bead) in this round and likewise held in place by a coiless safety pin until the Round 2 chain connects these together. 


Wind about 1 M / yard of thread onto a shuttle without cutting it from the ball.  Using the diagram below, begin SCMR at point designated with the star and proceed as follows:

Central Ring:

SCMR: *3 ds, long lpb (4 beads), 3 ds, p *.  Repeat from * to * four times leaving off the final p. Close SCMR.  DNRW. 

Round 1:

Begin Ch with a vsp, * Ch 4 ds, lbp (1 bead), Ch 7 ds, lj to lbp of prev R leaving a small space, 7 ds, lbp (1 bead), 4 ds, lj to next p of prev R *.  Repeat from * to * 4 times leaving off the last p and lj to vsp that began the round.  Cut, tie and hide ends.

Round 2:

Re-wind shuttle with about 12 in / 30 cms of thread and do not cut from ball. Join to any vsp at the join of the lbp (4 beads) of the previous Round and begin chain.  *Ch 9 ds, p, 9 ds, lj simultaneously to both lbp’s of the previous Round, Ch 9 ds, p, 9 ds. Lj at top of lbp (4 beads) of previous round *.   Repeat from * to * 4 times, and lj the base of the first chain.  Cut, tie and hide threads.   

Finish:

Cut a length of thread measuring approximately 45 to 50 cms / 18 to 20 in.  Using a tapestry needle, thread one end of the length of thread and begin weaving it through the free picots alternating between the cap created by the above pattern and spaces between the chains on one of the sides of the Endrucks #32 motif around the widest portion of the ornament.  When all the spaces and picots have been threaded, adjust the tension between them to be neat and equal, then cut, tie and hide thread ends.

E32’s reworked pattern’s pdf is part of the Endrucks 1920 Project, please for any detail refer to the main Endrucks 1920 Project document: https://docs.google.com/document/d/17LEVftXweztBIOWh4sL4BB7bX65ssoOsOn4oXIgCepY/view )

The pattern may be reproduced for personal use and tatted freely.  

November 21, 2024

Yuletide is rapidly approaching and while we don't think we will be in the new house by Christmas Day, preparing ornaments has been a priority.   We probably won't have a tree or any serious decorations this year, but I'll be ready for 2025!

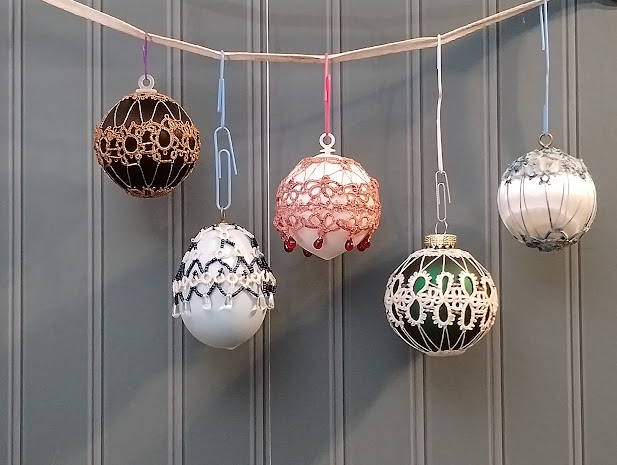
Below you see 5 ornament balls with their tatted covers.  From left to right, there is a black satin-wrapped styrophone ball covered with Olympus Lame Metallic thread color # 408 Bronze with added gold-ish bugle beads.  The pattern for the central motif was adapted from pattern 19 in Frau Endruck's Tatting / Schiffchen-Spitzen  publication of 1920.  The second ornament is actually a pale blue egg-shaped ornament addorned with white Lizbeth thread, size 20 and navy blue beads.  This was truly nothing fancy - simply 4 p 4 p 4 p 4 rings with the 11/0 seed beads covering what would be the chain thread and white tear-drop beads between the ring segments.  The third ornament is created using Joelle Paulson's 2012 "Flowering Quatrain Bookmark" (available on her blog) as the central wrap of the motif. It was created using the Italian thread "Master Metallic" in the color red/gold a personal favorite because it holds its shape so well when working up a pattern.  Not widely available Master Metallic is a special metallic thread unlike most of the others of that type. 


Number 4 is a pattern found in a photograph on Pinterest that I had to work out independently.  It is placed over a frosted green glass ornament.  The fifth ornament is again worked over a satin-wrapped styrofoam ornament.  The pattern is one I have lost track of but was carried out using another Master Metallic thread.  In each case, there is a basic pattern of either a simple ring with picots, a clover pattern or simple snowflake with the appropriate number of picots that would allow for weaving individual thread between top or top and bottom, joining these motifs to the central ring.  


I'm not going to post any patterns here at this time.  Much of the motifs used were simply ones that were just worked from memory or from basic tatting design principles.  

November 14, 2024

Getting Ready for Christmas, 2024

 Over the past 6 months, we have been waiting for the completion of our new residence in Haywood County. The time has been filled up by spending time with our grandchildren and their parents as well as reaching out to get to know our new community.  As a bridge player, seeking out a group of like-minded card players also became a way to integrate into our new surroundings. Like a similar group that I am a part of, the local Haywood County bridge group has an annual Christmas outing that includes gifting with small tokens.  Tatting is a perfect way to carry this out while passing time in one of my favorite activities.

In 2022, those of us who attended Tat Days organized by and carried out by the Palmetto Tatters Guild in South Carolina were presented with some small tokens from tatting great Georgia Seitz's collection of findings or trinkets that could be used in tatting or other crafts.  What I left with was in a small zipper bag with a label:


For the past couple of years I have not known what to do with these charms.  By virtue of the fact that the bail or connecting hole on the finding is present on both the top and the bottom of this particular set of pendants, they could be connected together into a bracelet or similar chain of findings.  As a result, there is now a challenge to create somethiing to gift my friends.  Using these presented itself as( an opportunity to take them and other findings that I already had) to create something unique.  

Metallic thread or more traditional cotton thread used side-by-side with metallic or sythetic fillament.  Usually I rely on Lisbeth cotton in the sizes 20 or 40.  Lisbeth also has a metallic thread that is of blended nylon composition.  Other simiular threads are found as Razzle-Dazzle, Olympic Lame, Oren Basak and the older (and for the most part no longer available) Candlelight threads.  There are also much older cotton and fillament blended threads that can be very fragile and difficult to work with.  

While it too some time to develop a plan to use these findings, I am happy with the final product:


These can be used on sweater or jacket pulls, to mark keys or on wallet or Bibpe zipper.  These are just simple trinkets to gift friends for use as they see fit.  In this case, I added a few beads as well as the lobster clasps tatted with a colorful quilting thread that has a bronze fillament thread wrapped onto the shuttle Ankars style


September 19, 2024

The Twelve Snowmen of Christmas, 2024


The preparations for the 2024 Deck the Trees fundraising effort revolve around the theme of "Winter Wonderland." While the image above is only of five snowmen, a complete set of 12 have been finished for this season's Tatted Tree.  Some years ago - 2011 to be precise - Palmetto Tatters Guild's Tat Days Conference had a similar theme: "Tatting in a Winter Wonderland" which had artwork in the Logo that included a snowman.  This has prompted the idea that snowmen would be an outstanding addition to the snowflakes, angels and bells that have been gracing the Tatted Tree for the past 13 years. 

Patterns for snowmen are a bit of a challenge to find, but Sandy Scales and Barbara Foster have written  a free one that can be found on the Handy Hands Tatting site here.   It is cute and fairly straight-forward to carry out.  Another such design is Wanda Salmans' "Button-centered Tatted Snowman" written in 2015.  This one, too is simple but effective.  Monica Hahn included 2 snowmen patterns in her Dover Needlework publication entitled "Christmas Angels and other Tatting Patterns"  Debbie Arnold sells a pair of patterns in her Etsy Shop and a completed tatted snowman is available for purchase from Tatted Dreams by Jolene Etsy shop.  That was for the most part the extent of what I found.  If I missed anything, it's on me, but armed with these patterns I set to work.  


It took several months to finish them, but to date, I have completed a total of 12 snowman bodies from 3 different patterns including ones with button centers and an older pattern that I have modified so that it went together more smoothly.  If a hat was part of the pattern, such as in the Scales & Foster pattern, the over all appearance seemed rather stiff.   Some of the patterns did not include hats at all. So off to the land of images went I looking for something I could use to add whimsy to the finished products.  I found a few that I though might be suitable, printed them out, re-sized them as necessary and came up with 3 options that I thought might work.  They looked like this:


Craft foam sheets are cost effective and easy to cut through.  They are useful in many crafting applications and really fit the requirements in this case because they are light weight, solid construction and not translucent or transparent.  I traced off the reapective outlines for each design and cut each out so that I had hats that looked something like this once a hat band was added:


The hats aren't very big some smaller ribbons were in order.  Since I am confined to our camper until the house is finished, I have to rely on what craft supplies I can find in our storage lockers unless I want to purchase items I have no room for.  Each hat that was worked up ranged in size between 1 inch and 2 1/2 inches wide and no more than an inch high.  If the ribbons on hand were too wide, I cut them down to a suitable size before adding them to the craft foam "hats."  


For the most part, the items were something I could use easily, but the ribbon with the red pom-poms was going to require greater modification,  I cut off the red pom-poms for use as "buttons" reserving the white band for use on some hats themselves.  


With the 12 hats and respective bands ready to attach to the tatted snowmen, I used a fabric glue to put the parts together.


Any of the snowmen that did not have a face as part of the tatting or pattern was going to require adding sequins for eyes and mouth and something to indicate buttons on the "body."  


The hats taken from snowmen images really added a touch of fancifulness to these snowmen!  Lastly,  ribbon scarves and embelishments are added to the hats as well as hangers to mount them on the tree at the Monte Vista Hotel the first week of December.  More to follow once the date has arrived.


March 15, 2024

A New YouTube Channel for me

 Stumbled across a YouTube video that truly suited my tastes in Nature, DIY and decor pursuits.  Brandy at Making It My Own DIYs truly struck a chord with me when I watched her create beautiful SUNcatchers.  You can see the video here .  This is not the only Natural-typical creative video this channel has to offer, but overall I found her topics and presentations very pleasing and easy to follow!  

Spring is the ideal time to enjoy the lengthening daylight hours, so suncatchers are right in time with the season.  At the moment, all of my crafting supplies are packed away for our pending move, so I have nothing to use for follow through in creating my own similar designs.  But that will be for the future. . .

February 18, 2024

Moving to More Tatting

 I haven't created a post here in quite a while.  It has been quite a journey from late January to today.

The door on the art barn has been replaced thanks to our friend and HandiMan Alex.  The building is now secure and weather proof!

Meanwhile, I hit a problem in one of my tatting projects: it involved a pattern printed originally in Norwegian, I believe.  Once translated, there were some linguistic obsticals to overcome.  I am not sure if I made a mistake or if there was an error either in the pattern or in the translation, but something had to be re-arranged.  Sometimes, in cases like this, shifting emphasis to something else is beneficial.

One day I saw a Facebook post about a flower that had been created by Krystyna Mura based on a 1920 publication in German by Eleonor Endrucks.  Someone had suggested that the pattern might be suitable for a 3-D version.  Since that looked similar to other 3-D flower patterns I had tatted, noteably those of Linda S. Davies of England, I decided to divert my attention from that which was overwhelming me and give this a spin.  The resulting pattern is this one.  

The next several weeks were spent tatting the specimen, creating the pattern using Inskscape, testing and re-testing the written pattern and reaching the final outcome.

The project is known as Endrucks 1920 Project and is housed on Facebook.  It was begun in 2015 when Tatting Expert Georgia Seitz approached another Tatting Mentor known as Muskaan to tat one of the patterns pictured in the publication.

There is a particular twist on this story: Eleonore Endrucks' work is printed in an Old German Gothic font and rather than giving written patterns, the publication consists of mostly photographs of the works and a rather general description of the way she created each piece.  They are unique in their own right.  But with directions that are challenging to first read and then to carry out, the creation of each design is largely left up to anyone who can look at a photo and carry out the design.

The group was formed and was joined quickly by Ninetta Caruso, Martha Ess (who first scanned and donated the publication to the Antique Pattern Library, in the public domain), Vicky Clarke and many others.  Since that time, a wealth of patterns has sprung off the nimble fingers of many of the 2000 members.  To date, I have contributed several patterns or variations of patterns myself.  The most recent one being completed with the help of Muskaan during the past winter months.  It's titled "January Snowflake" and complete pattern can be found here.  


Since this pattern was completed, my husband and I have begun migrating our posessions to storage while we prepare to relocate nearer to our son and his family.  I do so miss my craft space which has been dismantled and tucked away for safe keeping.  But tatting is quite portable and I have good projects to keep my "crafter's urges" satisfied.

January 31, 2024

Transitions

 After spending a goodly amount of time renovating the Art Barn to make it more weather-proof and comfortable, we find that we are moving.  The process has begun:  we have our site selected, the land has been tested for septic and water systems and we have our building permit.  We have been packing like crazy and that also means purging unwanted items from EVERYWHERE!  

One of the first things I came to realize was that many of my acrylic paints were only about 1/2 used and truly were not my primary media.  Paper crafting was accomplished either with alcohol, dye or pigment inks or watercolor.  All things acrylic that had not been used for a year or more was packaged up and sent to the local charter school that concentrated on the arts.  In addition to the ancrylic paints, colored pencils, some of the less costly or professional brushes and papers for drawing or coloring were included.  In today’s environment, teachers often have to provide their own supplies for the classrooms, and I was met with gratitude from the school when I appeared with several boxes of the supplies.

Yarns and threads, patterns and instruction books, tools that will have uses later on, paper materials, stamps and dies have been (for the most part) grouped and put into storage.  My concern for my inks, dyes and paints is  that once stored in an unseated location, they might freeze.  While cleaning out the garage, I found a thick, styrofoam container that had once held a gift of fresh seafood that our children had sent for a gift.  This I packed with all the alcohol inks, resist sprays and bonding solutions.  Alas it wasn’t enough!

Through persistence, similar packaging solutions have been found by appearing at local pharmacies and grocery stores which also receive shipments of medicines or seafoods that require being kept cold in transit.  The efforts were well worth it! Next, the ink pads - both dye inks and pigment inks - will go into the newly located styrofoam containers.  During the summers, such containers are a bit easier to find, but during the winter months, no one needs coolers!  Once packaged up, I’ll leave these in climate controlled conditions until the VERY last minute before moving them to the unheated space.  Perhaps it will be far enough into the year that freezing won’t really be an issue.  Meanwhile, I’d rather be safe and not have to replace any that I don’t have to.


January 24, 2023

 Yule has come and gone.  It's still the New Year, but most of the celebrating is behind us all.  For the first time in many years, I did not get everything I wanted to accomplish before Christmas done.  Tree up, yes; decorating, for the most part, yes; but cards, not nearly!  So I am in the Art Barn, today,  fabricating cards to send even belated wishes to friends and family.  This is one year that the notion of “Better Late Than Never” is holding true!  However the cards created this year may just be stored for next year. . .

My original intention was to create about 20 cards for sending out this year, but it looks like it is going to be more like 15.  I have a number of sheets of deco foil that I wanted to use but the transfer sheets seem to have gone by the wayside.  Black 8.5 x 11” toner sheets that are sold in a 2-pack are available from several outlets.  Because of their size, they are very versitile and one version of them comes as "Peel-and-Stick" so that shapes can be cut from them and adhesive is already on the back for precise adhereing to the card or other object.   


However, these days the Gina K Designs Deco Foil decorative transfer sheets are mostly unavailable except for those that allow the creation of sentiments and none of them were available with Christmas / Yule / New Year greetings.  Time to re-evaluate once again.  


The transfer and toner sheets both do well if you are going to cut out a design accent for the card, but I was wanting to “use what I have” in the way of cut-outs and I didn’t have many “Merry Christmas” sentiment dies either.  Shapes were one thing, words another. 

I tried finding more design transfer sheets both from trusted retails and from Ebay - a usally suitable source.  It seemed odd that there were just NONE to be found.  Then after watching a YouTube Video by Jennifer McGuire Ink I learned that ThermoWeb and Gina K Designs have jointly developed a new product called Poly Glaze Sheets that you can reserve your order for them here or directly from Gina K Designs here.  They are designs only and a limited selection of sentiments at this time and claim to offer a more consistent seal between the glaze and the foil sheets.  I can see these in my crafting future!

Another method for using the foil sheets was to  fill in a stencil with “transfer gel” after it has been lightly adhered to cardstock using a low-tack spray created for this purpose.  I had some that was intended to hold quilt batting in place while the quilted top was prepped for the actual quilting process in which the stitching would go through the quilted top, the batting and subsequently through the back.  This turned out to be a bit too sticky and took more effort to remove than the product called “Pixie Spray” which was indeed created for this purpose.  


It worked beautifully and I was able to create several examples this way.  I used the low-tack spray to stabilize the stencil before spreading on the Deco Gel.  It's not a great image, but this is what you get:


The stencil used is Candlelight Stencil (SC-175) from Picket Fence Studios.  I allowed it to dry over night before applying first Deco Foil sheet called Iridescent.  This gave me a wonderful shimmering quality that while wasn't quite as wide as my card base, was what I was looking for.  I completed the card with a dark blue plaid card stock from the DCWV "Winter Basics Stack" accented by a thin stip of one of the sam manufacturer's Holographics Mat Stack collection.  The end product looked like this:


I also tried layering different colors of foil on the same stencil that had been pasted over with the Transfer Gel.  It is a bit more tricky to get the fine layers of foil into the proper position but the outcome was certainly acceptable for a first attempt:


There are 4 different colors of foiling used in this sample, but the gold-tone used in the flames doesn't show up the way I had wanted.  Also the cardstock was somehow stained and so I'll end up having to fussy cut this image out and re-mount it.  But that's what makes them "hand-made cards," isn't it?

According to some of my card-making mentors, a technique that involves foiling over embossed sentiments is another choice that I had considered.  The first time I tried it, I was unaware that the image or sentiment actually had to have embossing powder heat set over the stamped word or shape, so this ended in failure.  The next attempt went better and a third attempt followed, but still didn't give the results I was hoping for.  It seems in order to carry out this effectively, the sentiment needs to have a little more distance between the letters so that the sentiment will show up well.  Here's what I foiled compaired with simple embossing with metallic powder:


I find that the simple embossing is much easier to read, at least so far!  Oh and note the fussy-cutting around the multi-colored stenciling on the 3rd example!  Worked out just fine for a "hand-made card!"


December 03, 2022

Technique for card making using banner die

 I needed a birthday card for a man.  Most of the components of the card were readily on hand, but the one central idea was held in the word "THOUGHTS" as in  "Some Birthday Thoughts for You."  I already had a clever sentiment for the inside, but needed some tease to get the recipient to OPEN the card.  I searched high and low through my stash of sentiments and came up with nothing.  This meant that the element on the card was going to have to be created.  Creating is what crafters do best!

First step was to determine HOW to create the word Thought so that it would stand out and at the same time fit the card.  A piece of vellum that had been inked through a stensil was available and looked very good over a lighter color of craft cardstock.  So far, so good!  I have several sets of alphabet stamps and alphabet dies for cutting out the letters.  Not wanting to use an all caps font, I chose the Calligraphy style of Altanew's alphabet stamps because I had both caps and lower case letters.

I tried stamping them in a straight line, but wasn't happy with the final appearance.  Back to the drawing board.  I had some all-occasion stamps with banner dies (Hero Arts Ribbon Messages): 


So I pulled the larger ribbon banner and cut several of them from some co-ordinating color card stock.  These I glued together in a stack to create depth.  But how was I going to get the stamps to fit since they were just letters that had to be shaped onto the curve of the ribbon banner?  My solution was to trace the inside of the ribbon banner onto a scrap piece of card stock then stamp the letters to see how they would fit and if they were going to be too big or too small:


The next step was to take a piece of the cardstock from which I had already cut one of the ribbon banners and place it ON TOP of my stamp positioner with a piece of white (maybe I should have used the lighter colored craft) cardstock lying IN the stamp positioner directly under the template created by the cut-out lying on top of the stamp positioner's lid.  


This way I could see exactly where to place the stamps to create the word and to keep it within the curves of the banner. Each letter had to be placed individually because the script style of the letters allowed them to flow together as if they had been written.  This worked beautifully!  Then I was able to fussy-cut the word and glue it to the layers of banner.  

As luck would have it, Altanew has several sets of sentiments that complimented this Calligraphy font nicely.  This way, no conflicting fonts had to be used on the front of the card:


The one with the sentiments written out is called Painted Greetings.


A party hat sticker and some dots completed the front of the card.  Ta-Da! the finished card front with a cleaver sentiment inside that reads: "in Wine there is Wisdom, in Beer there is Freedom, in Water there is Bacteria"  signed Cheers!


It's not Hallmark. . .  It's a hand made card!  

Search This Blog

About Me

My photo
I've been a Crafter for as long as I can remember. For more details, see my complete profile

Craft and Art

 During the past 6 or 7 months, we have been waiting for our new home to be ready for us to move into, there has been some time for reflecti...